
Why Wandering Jew Is So Easy to Propagate
Mastering wandering jew propagation basics is incredibly easy because this plant is biologically wired to multiply fast. We once accidentally snapped a stem off our Wandering Jew, dropped it in a water glass, and saw new roots forming just three days later.
The secret to this rapid speed lies in its vigorous herbaceous growth and highly active root nodes. When the stems touch moisture, they quickly send out roots to anchor themselves. Understanding these growing wandering jew propagation basics makes multiplying your collection almost completely effortless.
You will actually need to learn how to propagate wandering jew just to keep your mother plant looking full. As they age indoors, especially during our dark Danish winters, the base of the stems often loses leaves and becomes completely bald.
Instead of tossing a leggy plant, you can simply chop it up and restart. We will guide you through tradescantia propagation using both water and direct soil methods. Applying good wandering jew propagation basics care guarantees your fresh cuttings will quickly take hold.
Once you understand these healthy wandering jew propagation basics, you will never have to settle for a bald, stringy houseplant again.
📚 Want to learn more about Wandering Jew?
Read our deep-dive guide: Wandering Jew Care Guide
Best Time to Propagate Wandering Jew
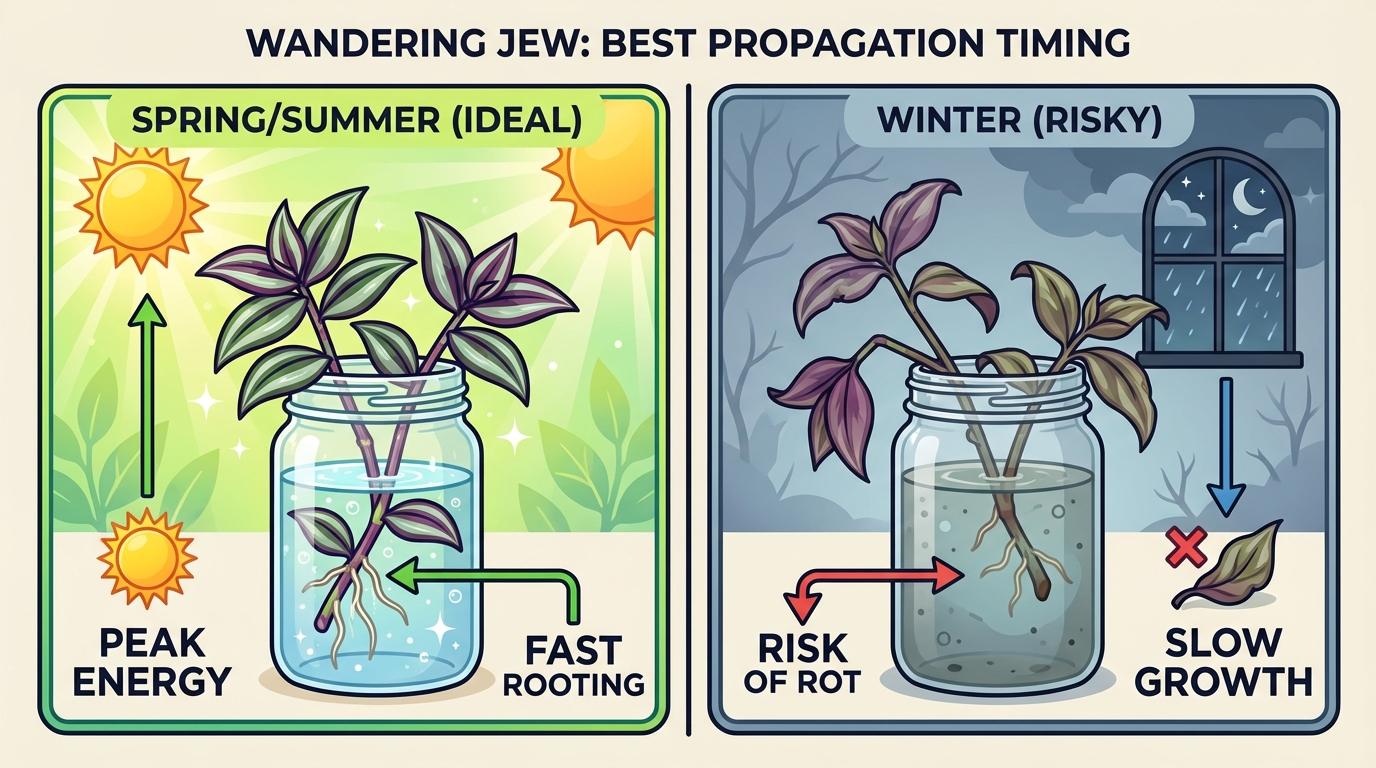
If you are wondering exactly when to propagate wandering jew, the straightforward answer is spring and early summer. This is the period when the plant pushes out its most active and vigorous growth.
Living in Denmark, our winters are incredibly dark and long. Because plant metabolism drastically slows down without adequate light, winter cuttings take much longer to root and frequently rot in cold water.
We have experimented with how to propagate wandering jew in every single season. While you technically can take cuttings year-round, you want to keep the mother plant growing. When to propagate wandering jew simply comes down to capturing that peak spring energy.
Emilie usually gives our Wandering Jew a massive haircut in late March. The moment the morning sun finally clears the apartment building across our street, we start snipping off the longest, leggy stems.
Taking cuttings during this active window is the best way to keep them healthy. When to propagate wandering jew is closely tied to the plant’s natural hormone levels, which peak during warm, bright months.
According to the NC State Extension, this species establishes roots remarkably fast under warm conditions. Because of this biology, our spring cuttings usually show visible white roots in just three to five days.
Mastering your when to propagate wandering jew care routine makes tradescantia propagation completely stress-free. If you absolutely must take a cutting in December to save a dying plant, place it near a radiator and use a grow bulb to fake that summer sun.
📚 Want to learn more about Wandering Jew?
Read our deep-dive guide: Wandering Jew Care Guide
Water Propagation Step-by-Step
If you want to propagate wandering jew in water, the process is incredibly fast. We often see fresh roots forming in just three to four days on our kitchen windowsill. This type of tradescantia propagation is practically foolproof, even in the middle of a dark Danish winter.
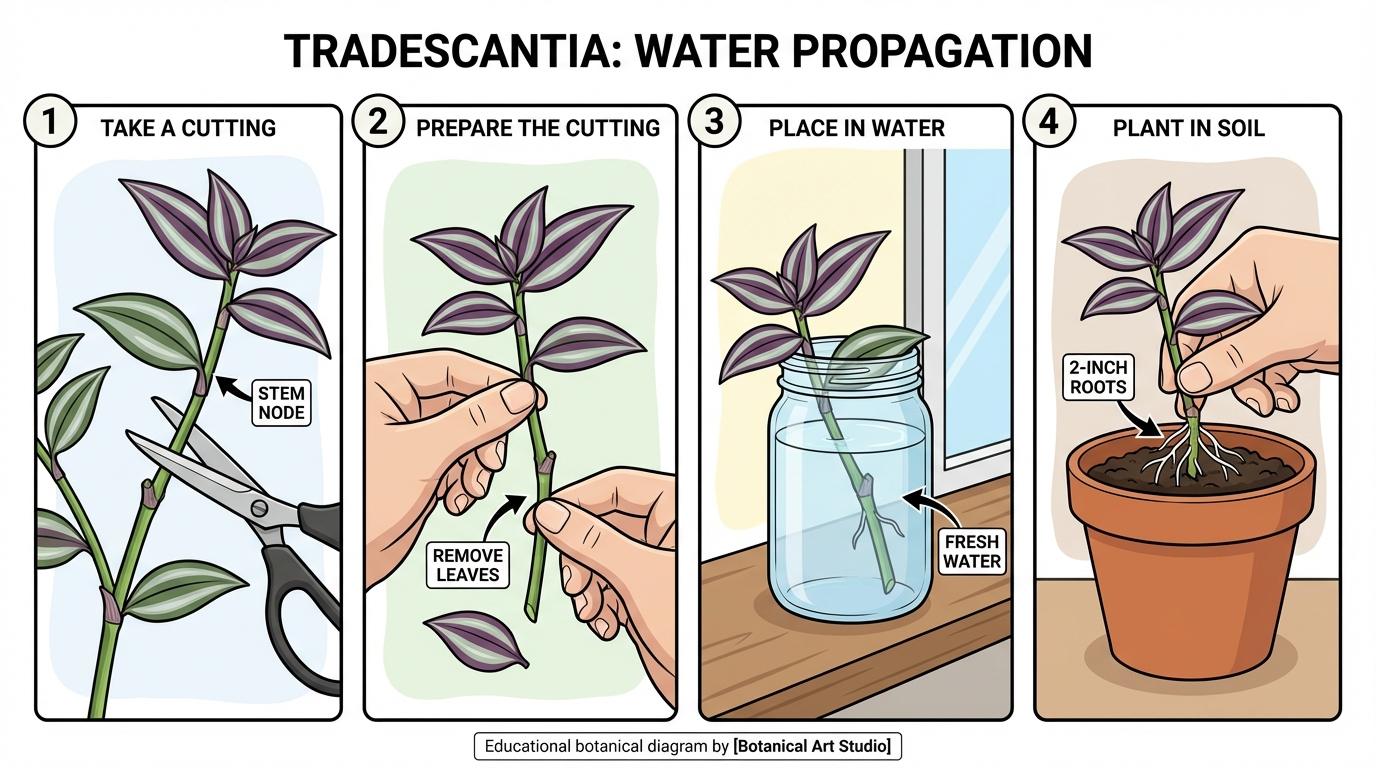
1. Take the Right Cutting
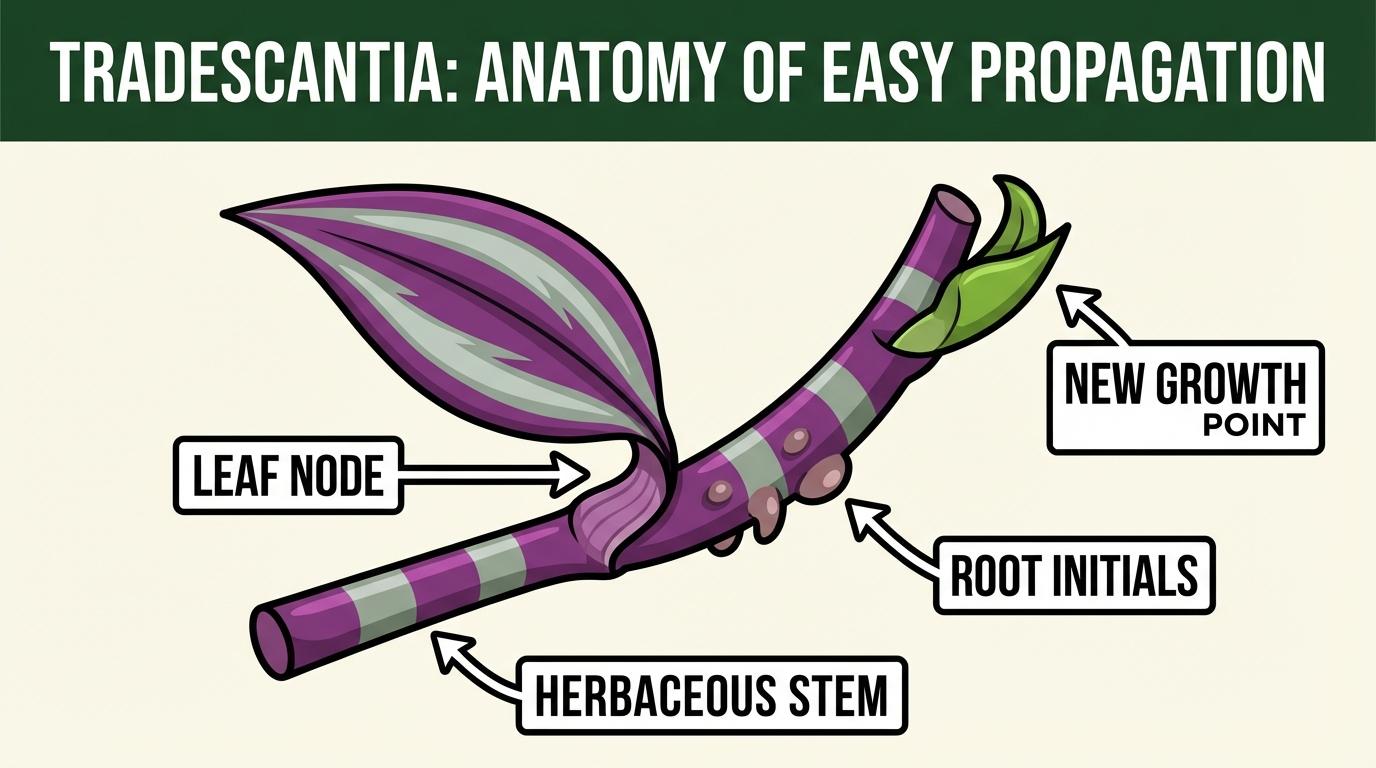
Mastering wandering jew propagation starts with finding the stem node. This node is the slight swelling on the stem where the leaves naturally attach. You will want to snip your stem roughly half an inch below this bump using clean scissors.
2. Remove Lower Leaves
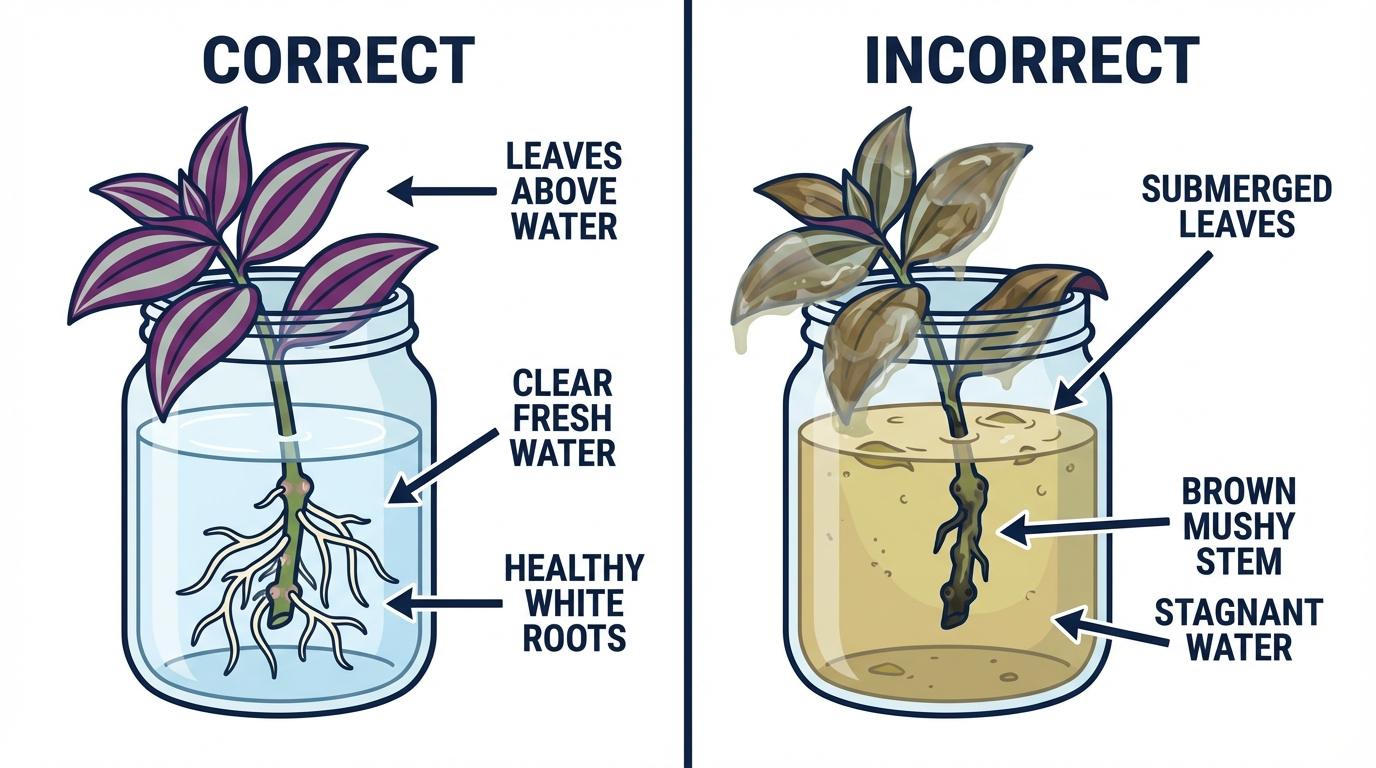
Pinch off the bottom leaves from your cutting, leaving just two or three at the top tip. If leaves sit submerged, they will quickly rot and introduce harmful bacteria. A healthy propagate wandering jew in water setup relies entirely on keeping the water clean.
3. Provide Light and Fresh Water
Place the bare nodes into a glass jar filled with tap water. We use regular Aarhus tap water, though it is notoriously hard, and our cuttings do just fine. Give the jar bright, indirect light.
Proper propagate wandering jew in water care requires changing the liquid every three days to replenish oxygen. The University of Wisconsin-Madison Division of Extension notes that rooting hormone is completely unnecessary for this vigorous plant.
4. Transfer to Potting Soil
When figuring out how to propagate wandering jew, timing your soil transfer is critical. Your Wandering Jew will develop white roots rapidly in the glass. Once these roots reach about two inches long, plant them directly into a moist, well-draining soil mix.
For continuous growing, propagate wandering jew in water only until those initial roots form. Leaving them submerged indefinitely creates weak roots that struggle to adapt to dense soil later. Moving them quickly ensures a fuller, stronger houseplant indoors.
📚 Want to learn more about Wandering Jew Propagation?
Read our deep-dive guide: Wandering Jew Propagation Guide
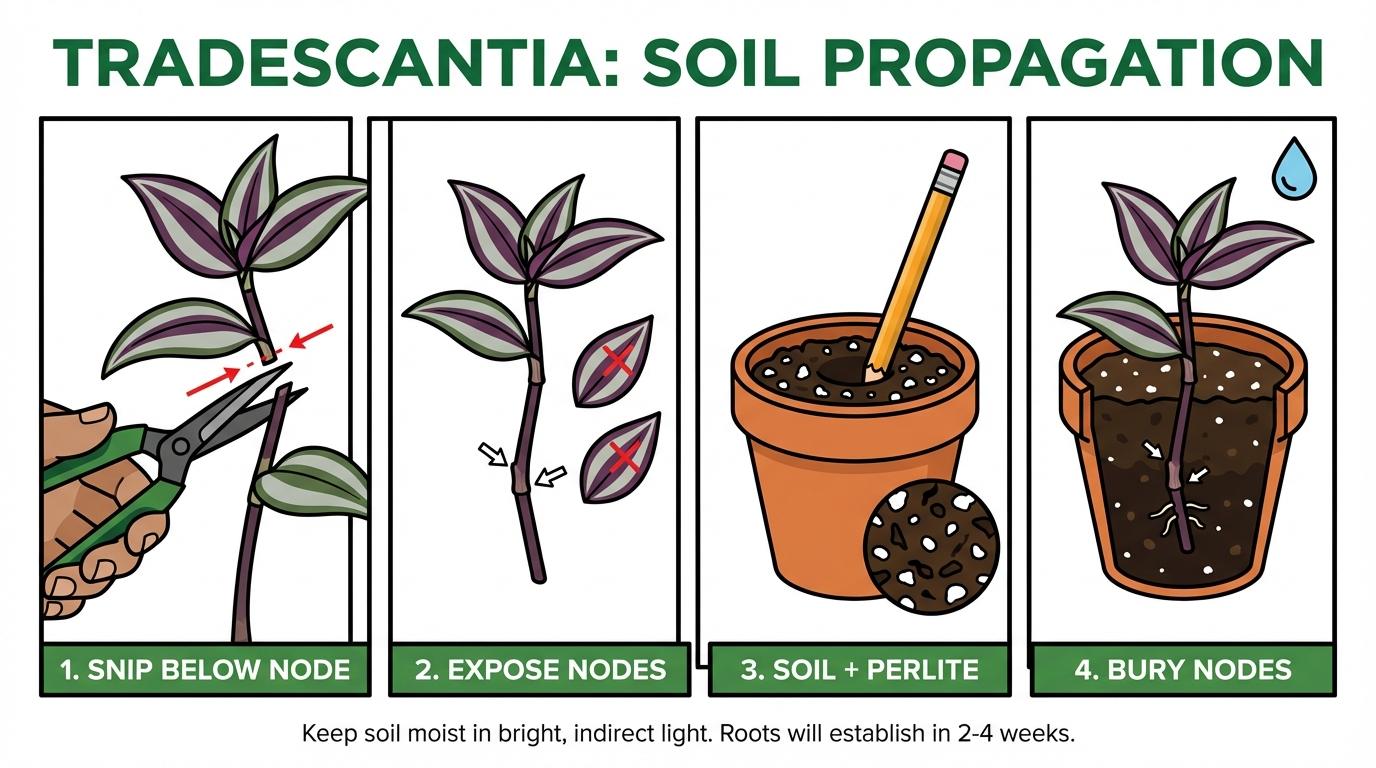
Soil Propagation Step-by-Step
While water rooting is fun to watch, we actually prefer to propagate wandering jew in soil. It skips the awkward transition phase where water roots have to completely adapt to a dense potting mix.
If you are wondering how to propagate wandering jew the fastest way possible, sticking stems directly into dirt is the answer. This direct tradescantia propagation method builds stronger root systems from day one.
We highly recommend trying this method when your Wandering Jew gets too long and stringy indoors. Here is exactly how we do it in our Aarhus apartment.
1. Take Quality Cuttings
Snip a four-to-six-inch piece of stem right below a leaf node. We usually take five or six cuttings at once to guarantee a full, bushy pot from the very beginning.
Pinch off the bottom two leaves carefully. The bare nodes you expose are exactly where the fresh root systems will emerge.
2. Prepare the Right Mix
Do not just use heavy, wet compost straight from the bag. To guarantee a healthy propagate wandering jew in soil routine, mix standard houseplant dirt with a generous handful of perlite.
According to horticultural data from the University of Wisconsin-Madison, excellent drainage is vital to prevent stem rot. In our cool Danish climate, extra perlite keeps the dirt airy and safe.
3. Plant the Stems
Poke a small hole in your dirt mix with a chopstick or pencil. Gently slide the bare stem in, burying at least one or two nodes beneath the surface.
Press the dirt lightly around the stem so it stands upright. If you are focused on growing, propagate wandering jew in soil using multiple stems in one pot for immediate fullness.
4. Manage Light and Moisture
Give the pot a light watering to settle the dirt against the stems. For the first two weeks, keep the surface slightly moist but never a soggy mess.
Perfect propagate wandering jew in soil care requires bright, indirect light. We place our fresh pots near our east-facing window, ensuring they get enough energy without scorching the delicate new foliage.
You will know your wandering jew propagation was a success when you see tiny new leaves sprouting at the top. Usually, a gentle tug after ten days reveals firm, anchoring roots.
📚 Want to learn more about Wandering Jew Propagation?
Read our deep-dive guide: Wandering Jew Propagation Guide
Division Method for Overgrown Plants
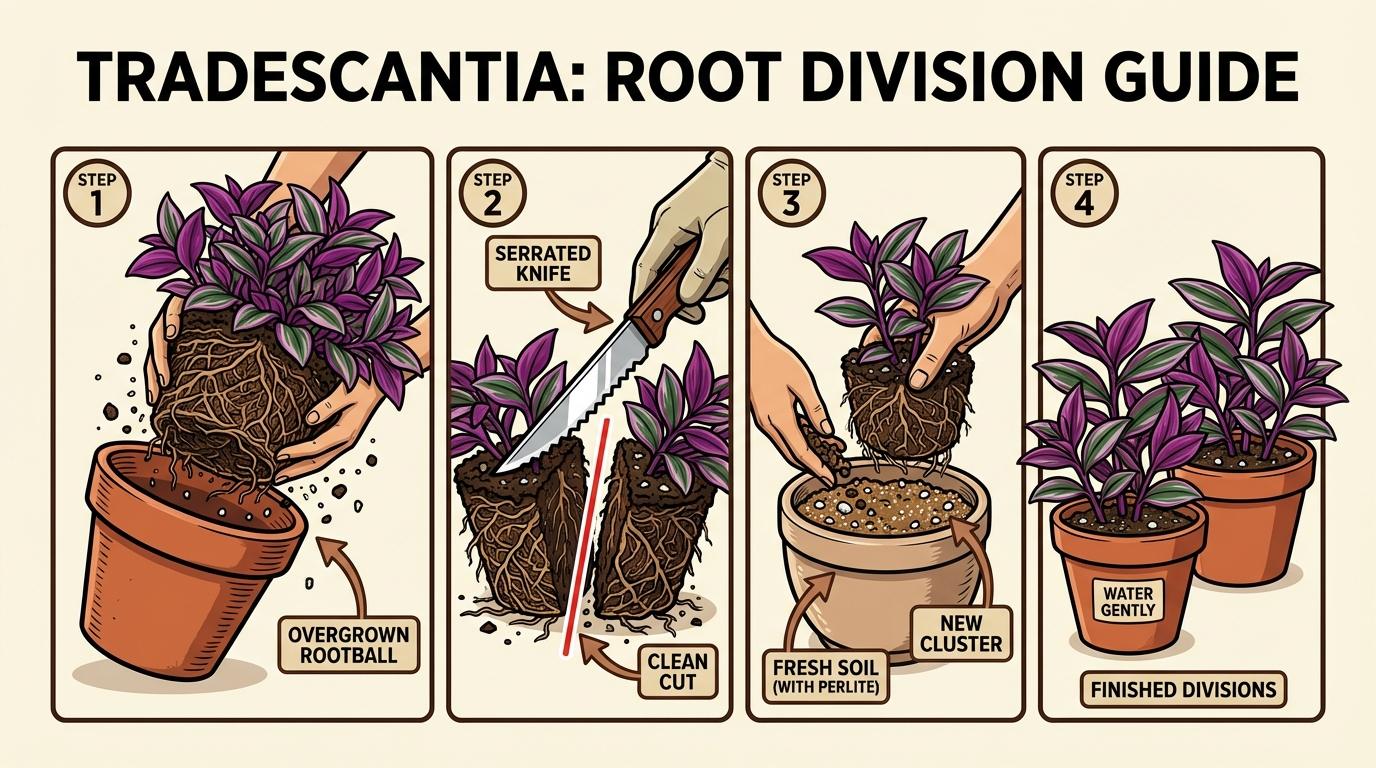
Sometime around year two, our Wandering Jew became an absolute monster that completely choked its pot. When a houseplant gets this massive, you need to learn to divide wandering jew plant roots directly.
This technique is entirely different from taking stem cuttings. It involves splitting the entire rootball into smaller sections to instantly create fully established plants. It is a fantastic method for tradescantia propagation when repotting.
Step 1: Unpot and Inspect
Gently slide your overgrown plant out of its container. Lay it on its side and massage the root mass to loosen the old, compacted dirt.
Finding the natural separation points is the secret to a healthy divide wandering jew plant routine. You will usually see distinct clusters of stems connected to their own root systems.
Step 2: Make the Cut
We used to pull the roots apart by hand, but that snaps too many healthy strands. Now, Joakim uses a clean, sharp serrated knife to slice straight down through the rootball, almost like cutting a loaf of dense Danish rye bread.
It feels brutal, but this aggressive wandering jew propagation method is backed by biology. The NC State Extension confirms their robust root systems bounce back quickly from mechanical division.
Step 3: Repotting the Sections
Place each new section into its own pot filled with fresh soil. Getting the dirt right is crucial for a growing divide wandering jew plant adjusting to its new container.
We use a mix of standard potting soil and plenty of perlite to ensure fast drainage. This prevents root rot while the traumatized root system heals indoors in our apartment.
Step 4: Aftercare and Recovery
Give the fresh pots a thorough watering to settle the soil against the exposed roots. You might notice the leaves looking a bit droopy for the first few days.
Do not panic if they wilt slightly. Proper divide wandering jew plant care simply requires placing them in bright, indirect light and letting them recover without interference.
Knowing exactly how to propagate wandering jew by division saves you from managing one impossibly heavy pot. It instantly multiplies your collection with mature, trailing vines ready to thrive.
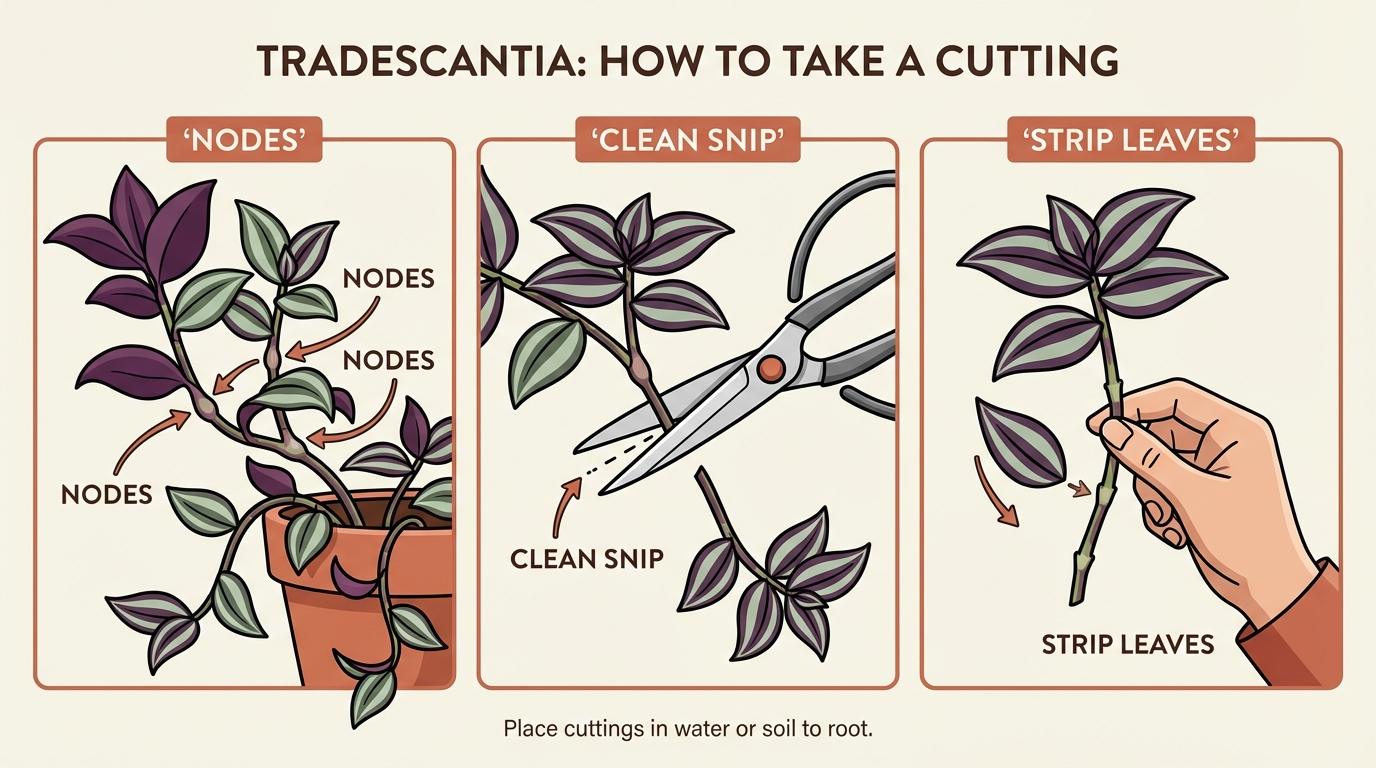
How to Take the Perfect Cutting
The secret to successful tradescantia propagation comes down to finding one specific part of the plant stem. You need to locate the wandering jew cutting nodes. These are the small, slightly swollen joints on the vine where the leaves emerge.
The University of Wisconsin-Madison Division of Extension explains that this species roots aggressively from these specific botanical joints. When submerged in water, healthy wandering jew cutting nodes transform their concentrated plant cells into a rapid root system.
1. Select a Strong Stem
We usually pick stems that are at least four to six inches long. Look for vines with strong color and firm leaves. If you are learning how to propagate Wandering Jew vines, avoid using the shriveled, older stems near the base.
2. Make a Clean Snip
Take a pair of sharp scissors. We wipe ours with regular rubbing alcohol from the local Matas pharmacy first to kill bacteria. You want to cut the stem exactly a quarter-inch below a node.
Practicing proper wandering jew cutting nodes care means making a clean slice so the delicate stem tissue does not get crushed. A jagged, bruised cut invites rot, especially when rooting cuttings indoors during our humid Danish autumns.
3. Strip the Bottom Leaves
Once you have your piece cut, gently pinch off the bottom two sets of leaves. You must expose the bare joints directly to the water or soil.
If you leave leaves attached, they will decay quickly and ruin your wandering jew propagation project. Leaving at least two bare joints ensures you are growing wandering jew cutting nodes with the highest possible chance of anchoring new roots.
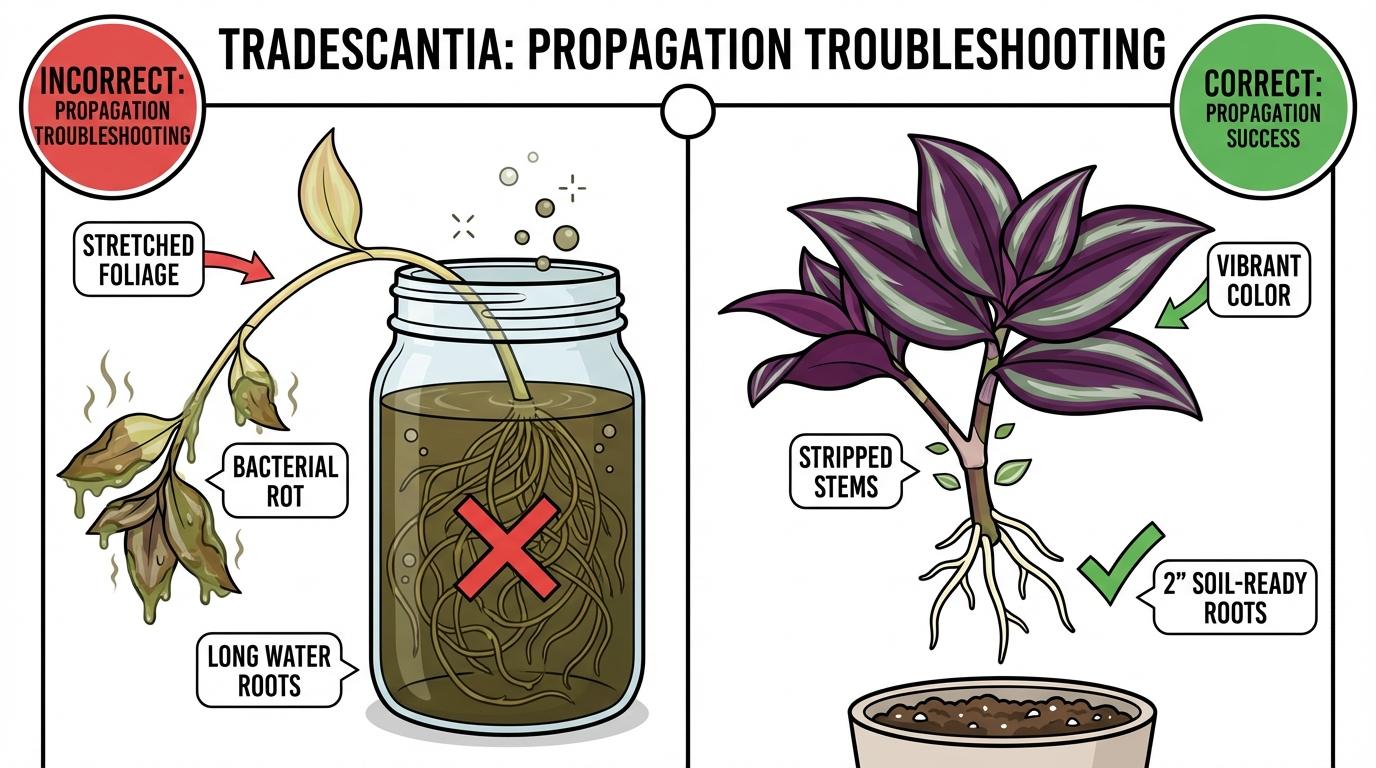
Common Propagation Mistakes and Fixes
Even with a very forgiving houseplant, you will inevitably run into wandering jew propagation problems. We learned this the hard way during our first dark Aarhus winter when half our cuttings turned to mush. Figuring out how to propagate wandering jew successfully takes a little bit of trial and error.
Mastering wandering jew propagation problems care usually comes down to controlling moisture and light. Below are the most frequent issues you might face during tradescantia propagation and exactly how we fix them in our apartment.
Mushy, Rotting Stems
The most common issue when you root cuttings indoors is sudden stem rot. This happens almost instantly when you leave bottom leaves attached and submerge them in your glass.
As bacteria breeds in the stagnant liquid, the stem turns black and smells terrible. Fixing healthy wandering jew propagation problems requires stripping the bottom two inches of the stem completely bare before placing it in water.
The University of Wisconsin-Madison Extension emphasizes that clean water is crucial for successful rooting. We wash our propagation jars thoroughly and change the tap water every three days to stop any bacterial buildup.
Stringy or Faded New Growth
Sometimes your cuttings root perfectly but start pushing out pale, stretched out foliage. Spotting these growing wandering jew propagation problems early saves your new plant from getting permanently leggy and weak.
Our long, overcast Danish winters trigger this exact issue constantly. If you are struggling with wandering jew propagation in low light, moving the jar closer to an east-facing window usually restores that classic deep purple color.
Just avoid placing fresh cuttings in direct, hot midday sun. The delicate, rootless stems of your Wandering Jew will dry out incredibly fast and crisp up on a warm windowsill.
Failure to Adapt to Soil
Have you ever moved a perfectly rooted water cutting into dirt, only to watch it collapse? This is one of the most frustrating wandering jew propagation problems you will ever encounter.
If you leave cuttings in water for months, they develop specialized water roots. These brittle roots struggle to extract moisture from dense potting soil once you finally decide to transplant them.
To avoid this, we transfer our cuttings when the white roots are exactly two inches long. Mixing a generous handful of perlite into the dirt helps those fresh roots breathe as they adapt to the soil.
📚 Want to learn more about Wandering Jew Propagation?
Read our deep-dive guide: Wandering Jew Propagation Guide
Caring for New Cuttings After Rooting
Proper wandering jew cutting care aftercare is the bridge between a fragile little stem and a robust, trailing houseplant. Once those fresh roots are sitting happily in their new pot, the real work begins. If you ignore them now, they will quickly wither.
When we first learned how to propagate wandering jew, we made the mistake of treating new cuttings exactly like mature plants. We blasted them with our radiators and drowned the soil. Successful tradescantia propagation requires a gentle transition period.
Moisture and Humidity Control
A critical part of healthy wandering jew cutting care aftercare involves keeping the soil consistently damp for the first two weeks. Fresh, immature roots dry out rapidly indoors, especially during our Aarhus winters when central heating drops the humidity below forty percent.
We use our fingers to check the top layer of dirt every single morning. If the surface feels barely dry to the touch, we add a small splash of lukewarm tap water. We also leave a bowl of water on the nearby radiator to combat the dry Danish air.
Dialing in the Right Light
To master growing wandering jew cutting care aftercare, you need to provide bright, indirect light immediately after planting. We place our fresh pots about a meter away from an east-facing window.
According to the University of Wisconsin-Madison Extension, these young plants establish much faster in warm, well-lit environments. Joakim’s light meter usually reads around 200 to 400 foot-candles in this spot, which provides enough energy without burning the tender leaves.
Feeding and Pinching Back
Do not add any liquid fertilizer during the first month. Your wandering jew cutting care aftercare care routine should focus entirely on root development right now. Adding harsh nitrogen too early will shock the delicate root system and halt your wandering jew propagation completely.
Once you see a new set of leaves sprout at the top of the cutting, give the stem a tiny pinch. We simply snap off the top little leaf joint with our thumbnails. This forces the Wandering Jew to branch out from the sides, creating a fuller, bushier pot.
Common Questions About Wandering Jew Propagation
Is the Wandering Jew plant toxic to cats and dogs?
Yes, Wandering Jew plants (Tradescantia zebrina) are mildly toxic to both cats and dogs. The plant’s sap contains calcium oxalate crystals that can cause dermatitis-like skin irritation, oral discomfort, drooling, vomiting, and diarrhea if ingested or brushed against. While it is rarely fatal and most pets recover fully within 24 hours, you should keep the plant out of reach of pets, ideally in a hanging basket.
How much light does a Wandering Jew plant need?
Wandering Jew plants thrive in bright, indirect sunlight. If the plant does not receive enough light, its vibrant purple and silver foliage will fade to a dull green. However, too much direct, intense afternoon sunlight can scorch the leaves.
An east- or west-facing window with filtered light is usually the ideal indoor location.
Why is the plant called ‘Wandering Jew’?
The plant’s name references a medieval Christian myth dating back to the 13th century about a Jewish man who supposedly mocked Jesus during the crucifixion and was cursed to wander the Earth until the Second Coming. The plant earned this nickname due to its aggressive growth habit, its ability to easily root and regenerate from tiny fragments, and its tendency to ‘wander’ and trail extensively as a groundcover.
What are the alternative names for the Wandering Jew plant?
Due to the antisemitic origins of the ‘Wandering Jew’ folklore, many horticulturists, sellers, and plant enthusiasts now use alternative names. It is commonly referred to as the ‘Wandering Dude,’ ‘Inch Plant,’ ‘Spiderwort,’ or by its botanical names: Tradescantia zebrina, Tradescantia fluminensis, or Tradescantia pallida.
How often should I water my Wandering Jew plant?
These plants require moderate watering and prefer their soil to be kept evenly moist but not waterlogged. A good rule of thumb is to water the plant when the top half-inch of the soil feels dry to the touch. Ensure the pot has proper drainage holes to prevent root rot, and reduce your watering frequency during the winter months when the plant’s growth slows down.
How do you propagate an Inch Plant (Wandering Jew)?
Propagating a Wandering Jew is incredibly easy. Simply snip a healthy stem cutting that is a few inches long and includes at least one leaf node. You can place the cutting directly into moist potting soil or into a jar of water until roots develop (which usually takes only 10 to 15 days), and then transplant it into a well-draining potting mix.
Why are the leaves on my Wandering Jew plant curling and turning brown?
Curling, drying, or browning leaves are typically signs of underwatering or a lack of humidity. While the plant likes well-draining soil, it shouldn’t completely dry out. Because it is native to tropical and subtropical areas, it thrives in environments with around 70% humidity.
Misting the leaves or placing a humidifier near the plant can help revive crispy foliage.
Can a Wandering Jew plant survive outdoors in winter?
No, Wandering Jew plants are not cold-tolerant and will die if exposed to frost or freezing temperatures. They can only be grown outdoors year-round in warm climates (USDA hardiness zones 9 through 11). If you live in a colder region, you must bring the plant indoors before nighttime temperatures consistently drop below 60 degrees Fahrenheit.
Why is my Wandering Jew losing its purple color?
The loss of vibrant stripes and deep purple color in a Tradescantia zebrina is almost always caused by inadequate lighting. When placed in low-light conditions, the leaves will revert to a solid, dull green to maximize chlorophyll for photosynthesis. Moving the plant to a spot with brighter, indirect sunlight will help restore its vivid coloration.
Is the Wandering Jew plant considered an invasive species?
Yes, in certain warm, humid regions—particularly in parts of the southern United States, South America, Africa, and Australia—some species of Tradescantia (such as Tradescantia fluminensis) are considered highly invasive weeds. Because they root easily from tiny, dropped stem fragments, they can rapidly carpet the forest floor and outcompete desirable native flora.
Do Wandering Jew plants need fertilizer?
While they are vigorous growers and do not strictly require heavy feeding, Wandering Jew plants benefit from occasional fertilization to support lush foliage and flowering. You can apply a diluted, balanced liquid houseplant fertilizer once or twice a month during the active growing seasons of spring and summer. Avoid fertilizing during the fall and winter.
What is the original folklore legend of the Wandering Jew?
The ‘Wandering Jew’ is a mythical, immortal figure from 13th-century European Christian folklore. According to the legend, a Jewish man taunted, struck, or refused to let Jesus rest against his house as he carried the cross.
As punishment, Jesus cursed the man to wander the earth continuously until the Second Coming. Over the centuries, the myth was often weaponized as an antisemitic trope and a metaphor for the Jewish diaspora.
Should I prune my Wandering Jew plant?
Yes, regular pruning is highly recommended. Wandering Jew plants tend to become ‘leggy’ over time, meaning the stems grow long with wide gaps between the leaves, and the base may lose its foliage entirely. Pinching off the tips of the vines and removing dead leaves encourages the plant to branch out at the nodes, resulting in a much bushier, healthier appearance.